Building an Attendance System Powered by Face Recognition Using React and FACEIO

Whether you’re managing a team remotely or teaching a group of students, having an attendance system can streamline the process of tracking who’s active and who’s not. An efficient attendance system not only improves record-keeping but also motivates team members or students to log their attendance consistently.
To take it a step further, you can make the process more secure by moving beyond traditional authentication methods like passwords or QR codes. By adding Facial Authentication, you ensure that attendance is both quick and fraud-proof.
In this article, we’ll build an Attendance System using React and FACEIO for facial authentication.
This is the Attendance system web application we will be building.

Sound cool? Let’s begin!
Prerequisites
Before we start, make sure you have the following ready:
- Basic understanding of JavaScript and React.js.
- A FACEIO account.
- Node.js and npm installed locally for managing dependencies.
- FACEIO NPM Package installed.
- A text editor or IDE, like VS Code.
What is FACEIO?
FACEIO is a facial authentication framework that can be implemented on any website with JavaScript to easily authenticate users via Face Recognition instead of using a login/password or OTP code.
Building the Attendance System
In this section, we will go through the process of setting up a React project and integrating the FaceIO library for facial recognition-based attendance tracking.
Setting up the React Project
To start, open your terminal and create a new React app using the following command:
npx create-react-app attendance-systemThis will create a new React project in a directory named attendance-system. Navigate into this directory to begin setting up the project.
cd attendance-systemThen install the FACEIO SDK:
npm install faceioThis will install the FaceIO library and its dependencies, allowing you to use its facial recognition features in your attendance system.
To use the FaceIO SDK, you need to install it separately. You can do this by running the following command:
npm install @faceio/fiojsYou can also install the FaceIO SDK using the following command:
npm install @faceio/fiojs@latestFor the web application UI, we are using Shadcn UI, so to install the required dependencies, run this command:
npm install react shadcn react-dom react-router-dom react-hook-form @hookform/resolvers yupWe can now create an Enroll and Login function for our system, but before we do that, let us initialize FaceIO into our page using a useEffect hook
useEffect(() => {
    const initializeFaceIO = () => {
      try {
        const faceioInstance = new faceIO("My Public_ID");
        setFaceio(faceioInstance);
      } catch (err: any) {
        setError("Failed to initialize FaceIO: " + err.message);
      }
    };
    initializeFaceIO();
  }, []);
The Authentication Component
Here, we configure the FACEIO public key in the faceIO constructor.
This component provides facial recognition for user authentication and enrollment using the FaceIO SDK. Users can register their facial data and authenticate securely using FaceIO.
In the src/pages directory, create a Auth.tsx file and enter the complete code from this GitHub repository.
Some snippets of the code here show how we define validation schema for integrating FACEIO using yup in the SignupSchema constant at const SignupSchema = yup.object().shape({});. Yup is a schema builder for runtime value parsing and validation.
We also define interfaces using FaceIODetails and then declare the FACEIO constructor globally using the Public ID from your FACEIO console, and initialize the FaceIO instance using useEffect
// Define validation schema using yup
const SignupSchema = yup.object().shape({
  name: yup.string().required("Name is required"),
  email: yup
    .string()
    .email("Invalid email address")
    .required("Email is required"),
});
// Define interfaces
interface FaceIODetails {
  gender: string;
  age: number;
}
interface FaceIOEnrollResponse {
  facialId: string;
  timestamp: string;
  details: FaceIODetails;
}
interface FaceIOAuthenticateResponse {
  facialId: string;
  payload: Record<string, any>;
}
interface FaceIO {
  enroll(options: {
    locale: string;
    payload: { name: string; email: string };
  }): Promise<FaceIOEnrollResponse>;

authenticate(options: { locale: string }): Promise<FaceIOAuthenticateResponse>;
}

// Declare the faceIO constructor globally
declare const faceIO: new (publicId: string) => FaceIO;

type Iuser = {
  name: string;
  email: string;
};

const Auth: React.FC = () => {
  const [faceio, setFaceio] = useState<FaceIO | null>(null);
  const [error, setError] = useState<string | null>(null);
  const navigate = useNavigate();

// Initialize FaceIO instance
  useEffect(() => {
    const initializeFaceIO = () => {
      try {
        const faceioInstance = new faceIO("fioac691");
        setFaceio(faceioInstance);
      } catch (err: any) {
        setError("Failed to initialize FaceIO: " + err.message);
      }
    };
    initializeFaceIO();
  }, []);
Key Features
- Uses
Reactwithreact-hook-formfor form handling andyupfor schema validation. - Integrates the FaceIO SDK for enrollment and authentication.
- Error handling for different FaceIO-specific error codes.
- Redirects users to the dashboard upon successful authentication or enrollment.
CheckIn and Out Component
This provides functionality for tracking attendance, including check-in and check-out times.
In the src/pages directory, we create this functionality in a CheckInOut.tsx file with the code like so:
type AttendanceLogEntry = {
  type: "Check-In" | "Check-Out";
  time: string;
};

export default function CheckInOut() {
  const [lastCheckIn, setLastCheckIn] = useState<string>("--:-- --");
  const [lastCheckOut, setLastCheckOut] = useState<string>("--:-- --");
  const [attendanceLog, setAttendanceLog] = useState<AttendanceLogEntry[]>([]);
  const [isCheckedIn, setIsCheckedIn] = useState<boolean>(false);

const getCurrentTime = (): string => {
    return new Date().toLocaleTimeString([], { hour: "2-digit", minute: "2-digit", hour12: true });
  };

const handleCheckIn = (): void => {
    const currentTime = getCurrentTime();
    setLastCheckIn(currentTime);
    setIsCheckedIn(true);
    setAttendanceLog((prevLog) => [...prevLog, { type: "Check-In", time: currentTime }]);
  };

const handleCheckOut = (): void => {
    const currentTime = getCurrentTime();
    setLastCheckOut(currentTime);
    setIsCheckedIn(false);
    setAttendanceLog((prevLog) => [...prevLog, { type: "Check-Out", time: currentTime }]);
  };
Get the full code in this repository.
Dashboard Component
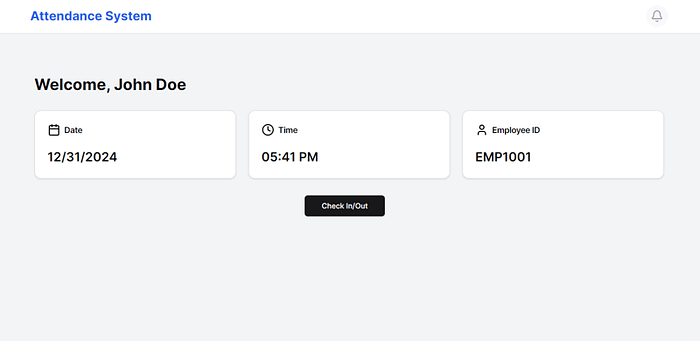
With navigation options, this displays user-specific information, such as current time, date, and employee ID.
For the dashboard, enter this code at src/pages/Dashboard.tsx
import { Button } from "../Components/ui/button";
import { Layout } from "../Components/Layout";
import { Card, CardContent, CardHeader, CardTitle } from "../Components/ui/card";
import { Clock, Calendar, User } from "lucide-react";
import { useNavigate } from "react-router-dom";

export default function Dashboard() {
  const navigate = useNavigate();

 return (
    <Layout title="">
      <div className="min-h-screen bg-gray-100 py-8 px-4 lg:px-2">
        <h1 className="text-3xl font-bold mb-8">Welcome, John Doe</h1>
        <div className="grid grid-cols-1 md:grid-cols-3 gap-6">
          <Card>
            <CardHeader>
              <CardTitle className="flex items-center">
                <Calendar className="mr-2" /> Date
              </CardTitle>
            </CardHeader>
            <CardContent>
              <p className="text-2xl font-semibold">
                {new Date().toLocaleDateString()}
              </p>
            </CardContent>
          </Card>
          <Card>
            <CardHeader>
              <CardTitle className="flex items-center">
                <Clock className="mr-2" /> Time
              </CardTitle>
            </CardHeader>
            <CardContent>
              <p className="text-2xl font-semibold">
                {new Date().toLocaleTimeString([], {
                  hour: "2-digit",
                  minute: "2-digit",
                  hour12: true,
                })}
              </p>
            </CardContent>
          </Card>
          <Card>
            <CardHeader>
              <CardTitle className="flex items-center">
                <User className="mr-2" /> Employee ID
              </CardTitle>
            </CardHeader>
            <CardContent>
              <p className="text-2xl font-semibold">EMP1001</p>
            </CardContent>
          </Card>
        </div>
        <div className="mt-8 flex justify-center">
          <Button size="lg" className="mr-4" onClick={() => navigate("/checkinout")}>
            Check In/Out
          </Button>
          {/* <Button size="lg" variant="outline" onClick={() => navigate("/attendanceLog")}>
            View Attendance Log
          </Button> */}
        </div>
      </div>
    </Layout>
  );
}- Now, let’s handle the Enroll and Login function
// The enroll function
const handleEnroll = async (user: Iuser) => {
    if (!faceio) {
      setError("FaceIO instance is not initialized.");
      return;
    }
    try {
      const response = await faceio.enroll({
        locale: "auto",
        payload: {
          name: user.name,
          email: user.email,
        },
      });
      alert(
        `Unique Facial ID: ${response.facialId}\n` +
          `Enrollment Date: ${response.timestamp}\n` +
          `Gender: ${response.details.gender}\n` +
          `Age Approximation: ${response.details.age}`
      );
      navigate("/dashboard");
    } catch (err: any) {
      handleError(err.message || "Unknown error");
    }
  };

// The login function
const handleAuthenticate = async () => {
    if (!faceio) {
      setError("FaceIO instance is not initialized.");
      return;
    }
    try {
      const response = await faceio.authenticate({
        locale: "auto",
      });
      console.log(
        `Unique Facial ID: ${response.facialId}\nPayload: ${JSON.stringify(
          response.payload
        )}`
      );
      navigate("/dashboard");
    } catch (err: any) {
      handleError(err.message || "Unknown error");
    }
  };
To enhance the robustness of our FACEIO integration, we can implement a centralized error-handling function. Below is an example of such a function, named handleError, which maps specific error codes to user-friendly messages.
const handleError = (errCode: string) => {
    const errorMessages: Record<string, string> = {
      PERMISSION_REFUSED: "Access to the Camera stream was denied by the end user.",
      NO_FACES_DETECTED: "No faces were detected during the enrollment or authentication process.",
      UNRECOGNIZED_FACE: "Unrecognized face in this application's Facial Index.",
      MANY_FACES: "Two or more faces were detected during the scan process.",
      FACE_DUPLICATION: "User enrolled previously. Cannot enroll again.",
      MINORS_NOT_ALLOWED: "Minors are not allowed to enroll on this application.",
      PAD_ATTACK: "Presentation (Spoof) Attack detected during the scan process.",
      FACE_MISMATCH: "Facial vectors do not match.",
      WRONG_PIN_CODE: "Wrong PIN code supplied during authentication.",
      PROCESSING_ERR: "Server-side error.",
      UNAUTHORIZED: "Your application is not authorized. Check your public ID.",
      TERMS_NOT_ACCEPTED: "Terms & Conditions were not accepted.",
      UI_NOT_READY: "FaceIO widget could not be injected onto the DOM.",
      SESSION_EXPIRED: "Client session expired. Restart the process.",
      TIMEOUT: "Operation timed out.",
      TOO_MANY_REQUESTS: "Too many requests. Upgrade your application for more capacity.",
      EMPTY_ORIGIN: "Origin or Referer HTTP request header is empty or missing.",
      FORBIDDDEN_ORIGIN: "Domain origin is forbidden from using FaceIO.",
      FORBIDDDEN_COUNTRY: "Country is forbidden from using FaceIO.",
      SESSION_IN_PROGRESS: "Another session is already in progress.",
      NETWORK_IO: "Network connection error with FaceIO.",
    };
const message = errorMessages[errCode] || "An unknown error occurred.";
    setError(message);
    console.error("FaceIO Error:", message);
};
Then, to integrate FACEIO into the user interface, we designed a simple Check-In form with fields for Name and Email and buttons for Register and Login. Here’s the JSX code for the form:
<div className="max-w-md overflow-hidden md:mx-auto mx-4 bg-white shadow-md rounded-lg">
<div className="p-6">
    <h1 className="text-2xl text-center font-bold">Check In</h1><form className="space-y-6 mt-6" onSubmit={handleSubmit(onSubmit)}>
      <div>
        <label
          htmlFor="name"
          className="text-sm font-bold text-gray-600 block"
        >
          Name
        </label>
        <input
          type="text"
          placeholder="Name"
          {...register("name")}
          className="w-full p-2 border border-blue-900 rounded mt-1"
        />
        {errors.name && (
          <p className="text-red-900">{errors.name.message}</p>
        )}
      </div>
      <div>
        <label
          htmlFor="email"
          className="text-sm font-bold text-gray-600 block"
        >
          Email
        </label>
        <input
          type="email"
          placeholder="email@mail.com"
          {...register("email")}
          className="w-full p-2 border border-blue-900 rounded mt-1"
        />
        {errors.email && (
          <p className="text-red-900">{errors.email.message}</p>
        )}
      </div>
      <div>
        <Button type="submit" variant="secondary" className="w-full">
          Register
        </Button>
      </div>
    </form><div className="flex flex-wrap justify-center gap-4 py-10">
      <Button
        onClick={handleAuthenticate}
        variant="default"
        className="w-1/2"
      >
        Login
      </Button>
    </div>
  </div>
</div>
{error && <div className="text-red-600">{error}</div>}
Putting it all together
To connect all the functionalities, enter this code in the App.tsx file in the src directory.
import Auth from './pages/Auth';
import CheckInOut from './pages/CheckInOut';
import Dashboard from './pages/Dashboard';
import { BrowserRouter as Router, Route, Routes } from 'react-router-dom';
function App() {
  return (
    <Router>
      <Routes>
        <Route path="/" element={<Auth />} />
        <Route path="/dashboard" element={<Dashboard/>}/>
        <Route path="/checkinout" element={<CheckInOut/>}/>
      </Routes>
    </Router>
  );
}
export default App;
Setting up FACEIO
Sign up for a FACEIO account and log in to the console. To integrate FACEIO into the application you are building, you must create an application and then get details like the app ID and API key, which will be in your env file and connect to FACE when the application is running.
Follow these steps to get started.
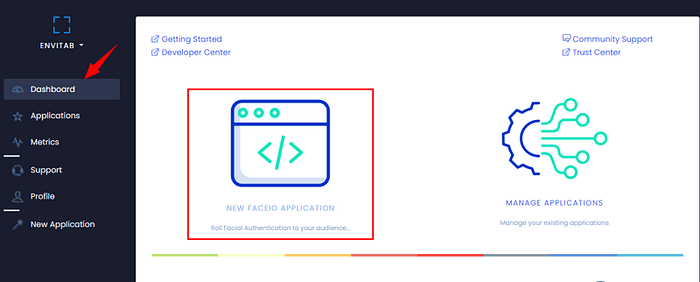
In the FACEIO console, click on Dashboard at the left sidebar and then click on the NEW FACEIO APPLICATION button
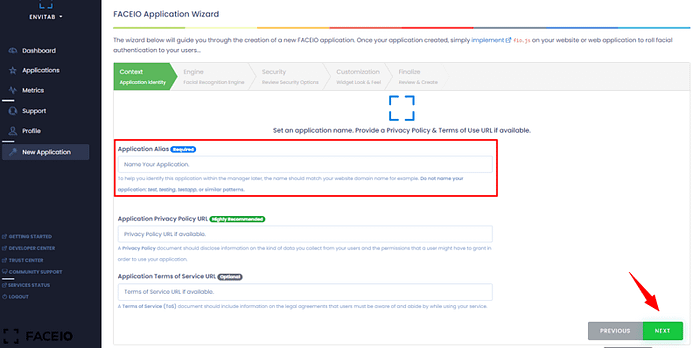
This will then open in FACEIO Application Wizard, where you enter details of the new application like:
- Application Alias: This is the name of the application (something you can easily remember) and is a required step to proceed.
- Application Privacy Policy URL: This is recommended if you have one available
- Application Terms of Service URL: This is optional.
After you enter the name, click on the NEXT button as shown below
The next step is to select a Facial Recognition Engine for the application that you want to integrate with FACEIO
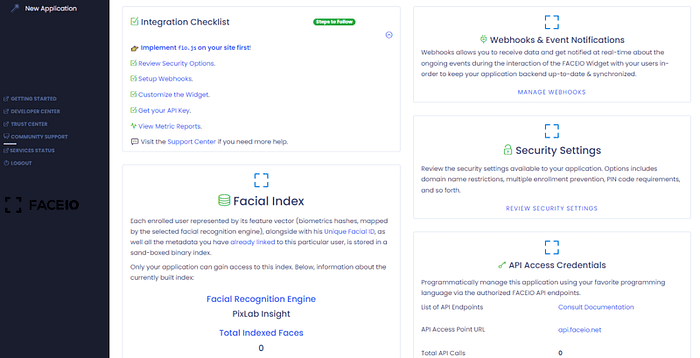
The facial recognition engine is the critical key component that is responsible for mapping each enrolled user’s face in real-time into a mathematical feature vector, better known as a biometric hash, which is, in turn, stored in a sand-boxed binary index.
For this use case, we will be using PixLab, so select it by clicking on the modal.

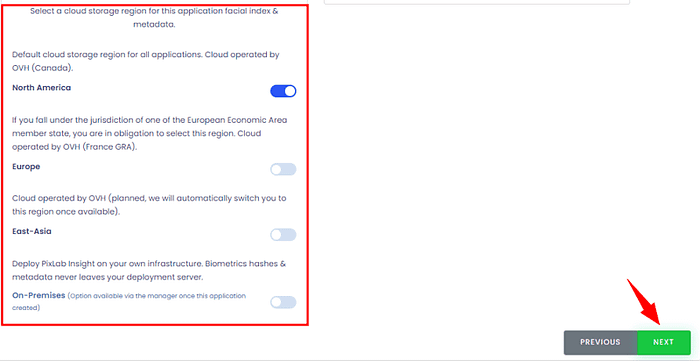
Then, scroll down and select a cloud storage region for the application’s facial index and metadata, and click on the NEXT button to proceed.
Moving forward, the next step is to review the default security settings recommended for most applications. You can refer to FACEIO’s Security Best Practices Guide for a general overview of the security practices & recommendations.
After you have reviewed the security settings, click on the NEXT button to proceed.
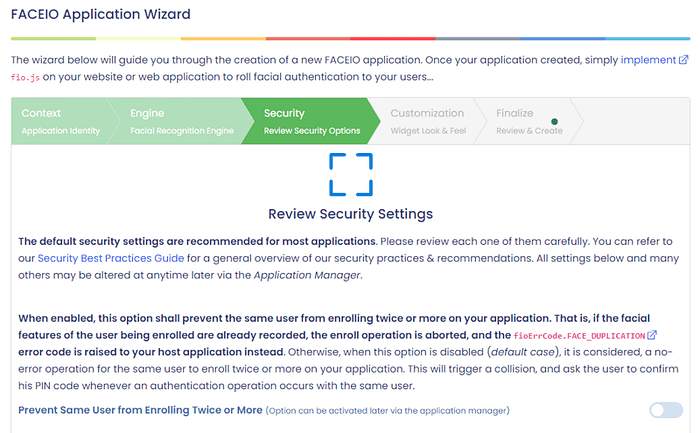
Also, via the FACEIO console, in the application manager, you can activate the option to prevent the same user from enrolling more than once when they are using your application
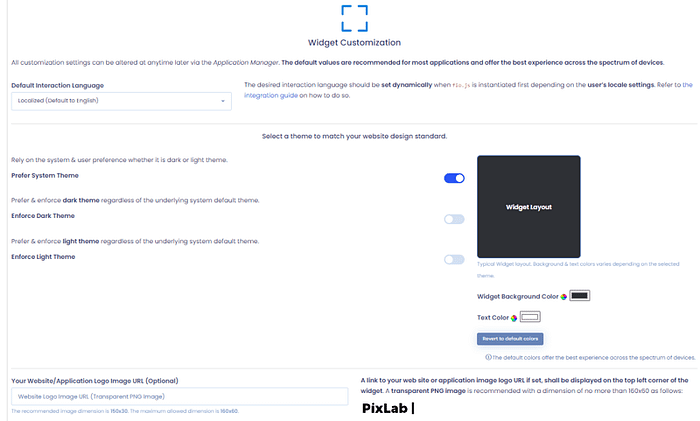
The next step after this (don’t worry, almost there) is to customize the FACEIO widget. You can select a theme to match your website design standard and also add a link to your website or application image logo URL — this will be displayed on the top left corner of the widget when your application is running and a user wants to start the facial authentication process.
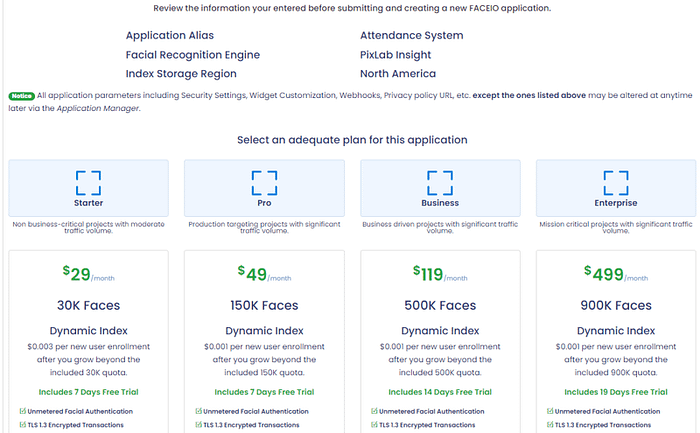
Then, review the information you entered before submitting and creating a new FACEIO application, and select an adequate plan for this application based on your budget.
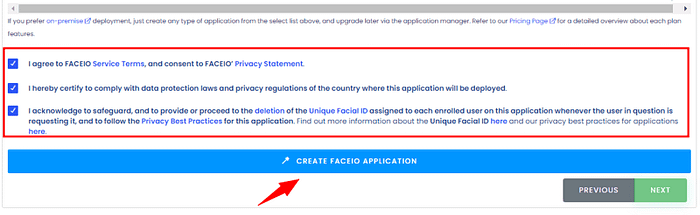
Next, agree to the service terms and click on the CREATE FACEIO APPLICATION button
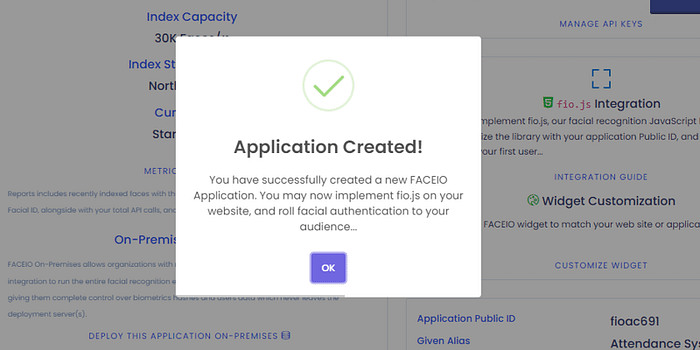
Then, you will see the successful modal for the newly created FACEIO application.
Then a dashboard for this new application loads with information like the app’s Public ID, API Key, integration guides and other information needed.
Once your application is created, simply implement
fio.json your website or web application to roll facial authentication to your users.
Copy the app Public ID and enter it in the env file in the project root directory.
Public_Id = "your-app-ID"Running the application
To run the web app, enter npm run dev in your terminal, then open this URL in your browser: http://localhost:5173/
Then the Attendance System loads as shown below:
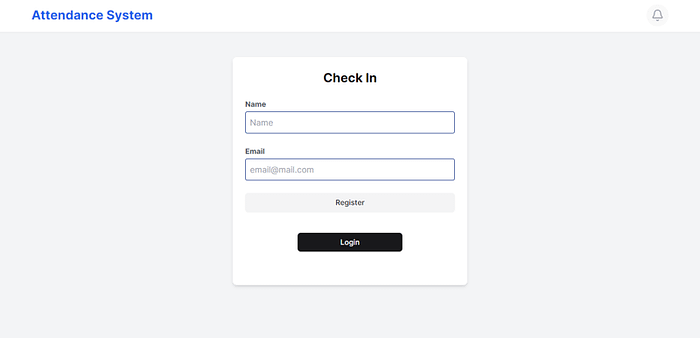
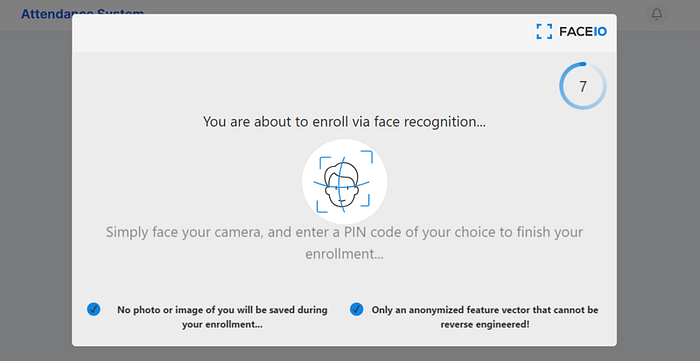
Enter your name and email, then click on Register, which then begins the Facial authentication process with FACEIO before you access other Attendance system and log your attendance.
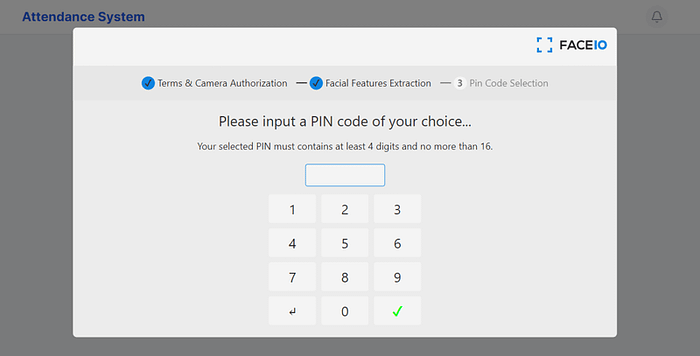
You will also be asked to set a PIN for the app
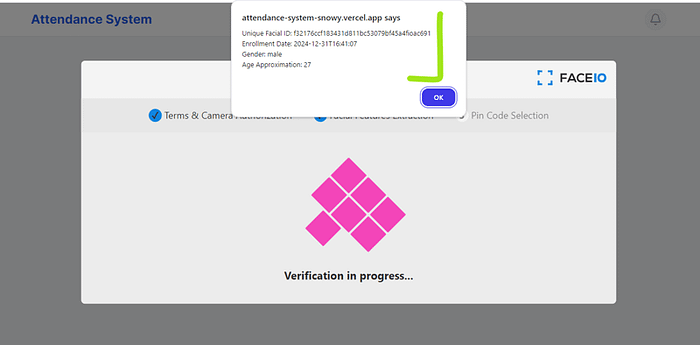
After successful authentication with FACEIO, it records and displays the unique facial ID, enrollment date, gender, and approximate age of your application users.
This adds an additional layer of security to the application and prevents one user from logging multiple records of attendance.
Then, you can view the dashboard and click the Check In/Out button to log your attendance.
The attendance system then records the date, time, and employee ID for checking in.
Now click on the Check In button to check-in.
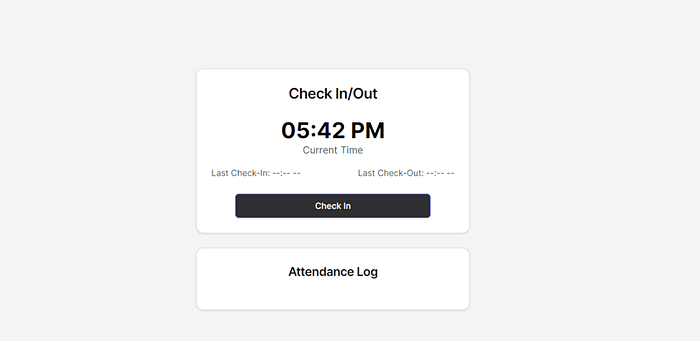
After that, you can view the attendance log as shown below

You can also check out by clicking the Check Out button

And that’s it, we have built an Attendance system with Facial Authentication for better security.
With this application, you can enhance it further to track the attendance of employees in the organization, as in the use case for the app.
Git clone the repository
git clone https://github.com/Tabintel/Attendance_system.gitInstall dependencies
npm installThen, run the app and open the URL in your browser.
http://localhost:5173/
npm run devYou can also try out the application using the live link here
Wrapping Up
In this article, we built a simple attendance system for facial authentication using React and FACEIO. By leveraging FACEIO’s advanced security features, we created a secure and fraud-proof solution that can be extended for use in workplaces, schools, or any environment where attendance tracking is needed.
Also, visit the FACEIO Forum for community support and discussions.
Happy coding!
Thank you for being a part of the community
Before you go:
- Be sure to clap and follow the writer ️👏️️
- Follow us: X | LinkedIn | YouTube | Newsletter | Podcast
- Check out CoFeed, the smart way to stay up-to-date with the latest in tech 🧪
- Start your own free AI-powered blog on Differ 🚀
- Join our content creators community on Discord 🧑🏻💻
- For more content, visit plainenglish.io + stackademic.com